Kiss Me Deadly...Femme Fatale Lingerie


Jezebel Longline in Red

Alouette
The Vargas Chemise
Jolie bra, garter & panty
all images via Kiss Me Deadly

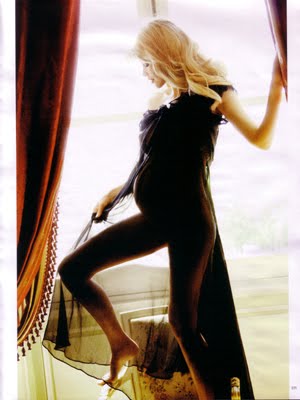
It's always fun when a contemporary designer can reinvent vintage lingerie into a fresh, sultry collection. Kiss Me Deadly is one of those brands that brings the 6-strap garter belt back into its full glory and creates figure-flattering pieces that make you a modern-day Ava Gardner! We just got the Vargas chemise and the Jolie bra/panty/garter set (for ourselves) and had a lot of fun playing around with the new pieces. The Vargas chemise is as effective as a Spanx slip, but as beautiful as a vintage pin-up ad. The Jolie bra lives up to its name with some lovely detail in its stitching and its retro cut.
The Jezebel Longline in red is also pretty stunning...something to put on the wish list.
This UK label has built quite a good name for itself (since launching in 2006), and each design is typically modeled by Morgana, the face of the brand who you see in all of the images above.
There are actually quite a few styles to chose from, with only a small selection shown here. To shop the Kiss Me Deadly brand (which is surprisingly well-priced, we were pleased to discover), click here.

* * * * * * * * * * * * *
Make sure to follow us on Facebook, Twitter, Bloglovin' or Google Friend Connect
Shop with us at Faire Frou Frou

Lingerie as Outerwear - by Serge Leblon

in each picture the model is wearing a bra or bra top by Jean Paul Gaultier
Serge Leblon for ELLE magazine, model Yulia Kharlapanova

Really this entire post is more of an excuse to post that first picture...isn't it so classic?! Perhaps we should set up a Tumblr account for these fantastic images we find and wish to share. Nonetheless, the Elle magazine editorial had a few more lingerie as outerwear looks that rounded out our post, and also had us impressed with the latest designs of Jean Paul Gaultier. Granted, Gaultier has a history of designing lingerie-inspired looks, so it's no surprise we're impressed.
To see the entire Serge Leblon shoot, click here.

* * * * * * * * * * * * *
Make sure to follow us on Facebook, Twitter, Bloglovin' or Google Friend Connect
Shop with us at Faire Frou Frou

Would You Believe This is a Shoe Ad?

Dolce & Gabbana lingerie, Valentino shawl

Dita von Teese wearing a Catherine D'Lish costume
images via Plastic Dreams magazine, photos by Sandrine Dulermo & Michael Labicaare

Since we're practically the unofficial Dita von Teese blog (we wish!) these images from Plastic Dreams magazine had to be posted! Dita is the cover girl for the latest issue of Plastic Dreams which is a publication for the eco-friendly Brazilian shoe company Melissa. Dita is modeling PVC shoes in each picture, but the costumes and the circus theme actually have us looking at anything but! However, these aren't just any plastic shoes because Melissa collaborated with top designers such as Vivienne Westwood and Jean Paul Gaultier for their latest collection. The Vivienne Westwood "Lady & Dragon" heel has actually gotten a lot of attention (or we've seen it several times over the past year), and we're guessing that with Dita as the latest cover girl these shoes will become even more popular.
If an eco-friendly plastic stiletto is on your wish-list, then your best bet is to look here.

* * * * * * * * * * * * *
Make sure to follow us on Facebook, Twitter, Bloglovin' or Google Friend Connect
Shop with us at Faire Frou Frou

Zinke Design

the Tea Party Jumper
the vintage clasp on this nightgown makes a lovely detail

all images courtesy of Zinke Design

It seems like time is flying by, and before you know it it will be Summer! A fun, fresh way to usher in the new season would be to start with these adorable loungewear pieces by Zinke Design (pronounced Zin-kee). Their Summer 2010 collection is hitting stores in a matter of days and consists of essentials you can comfortably relax in from day to night. We are particularly loving the violet and tangerine colorways...they remind us of a delicious bowl of sorbet!

To shop the new collection, click here for a store near you!

* * * * * * * * * * * * *
Make sure to follow us on Facebook, Twitter, Bloglovin' or Google Friend Connect
Shop with us at Faire Frou Frou

Those Stockings...

image via Sang Bleu magazine

This photo is just exquisite, particularly due to those fabulous stockings! We think the pattern might be scattered stars (we hope that's what it is)...or maybe just little dots? We wish we had more information about this image, but unfortunately we forgot where we found it (though at the very least we noted it was from Sang Bleu magazine).
We hope you enjoy as much as we do!

* * * * * * * * * * * * *
Make sure to follow us on Facebook, Twitter, Bloglovin' or Google Friend Connect
Shop with us at Faire Frou Frou

Miss Unkon... A Little Unkonventional

images via Miss Unkon

That little bra with the rosettes was too cute not to share! Each of these images is from the Spring 2010 catalogue of Australian brand Miss Unkon. The label is aptly described as one that "creates a dreamlike and creative storytelling aesthetic with delicate fabrics, fantastical prints and a whole lot of love for its wearers. Each collection takes you down memory lane of young love, self discovery, passion, adventure and the innocence of youth." Really, we couldn't have said it better ourselves.
To see the complete lookbook, along with many ready-to-wear pieces, click here.

* * * * * * * * * * * * *
Make sure to follow us on Facebook, Twitter, Bloglovin' or Google Friend Connect
Shop with us at Faire Frou Frou

Bubble Chandelier DIY

At long last we are excited to share the process of how we created the Champagne Bubbles "Frou Frou Chandelier" for our boutique (aka Bubble Chandelier for those of you who want a simpler name for it)!
Instead of paying $3,000-$7,000 for a chandelier, we thought it would be much more rewarding to create our own for just a few hundred dollars.
This is a step-by-step guide for how we made the chandelier you see at Faire Frou Frou. Our chandelier measures 2'x4' which we needed to make large enough to make a statement in our boutique. Of course you can create any size or shape that you wish.

Supplies:
Tools you will need:
See the little silver toggles on the table? We tied fishing line into a knot around the toggle and slipped it into the opening on top of the CB2 ball...the other end of the fishing line was tied to the wire grid.

Fastening the fishing line to the wire grid.

We suspended the wire grid from the ceiling, and started tying our fishing line to it from there. We made sure to place the wire grid under an existing ceiling electrical fixture so we could easily install the lighting. We also made sure that we had enough chain length to raise and lower the grid as needed.

Seeing the first 'bubble' hanging was so much fun


A view from above the wire grid. We later went back and trimmed the excess fishing line.

the first 60 glass balls have been hung...now onto the silver ball ornaments. (the light you see in the background is from another chandelier). Right around this step we added the 2 light fixtures.

we hung the small silver ornaments right up against the wire grid so as to hide it

Ultimately, the entire top of the chandelier should be covered with silver balls so as to fully conceal the wire grid. We actually placed some silver balls on top of the grid so as to hide it as best we could.


the finished product!
If you look closely (above) you can see the silver balls lining the top of the chandelier along the wire grid. You can also see the pink box cover that extends from the ceiling down to the chandelier itself (this picture was taken in the reflection of a large mirror).

Step 1: Insert your 4 chandelier hooks into the ceiling and attach about 2-3 feet of your white chain to each (make sure it is secured in the ceiling so as to carry the weight of the chandelier!). You need that extra amount of chain so that you can bring down the wire grid low enough to work on and install the lighting fixtures (and then raise up to the ceiling when you are done). Suspend the wire grid from the ceiling using your chains and s-hooks.

Step 2: At your work table, cut the silver wire into 2" pieces (your quantity depends on the number of glass balls you are using). Loop each 2" piece once around a nail to create the toggle. You can use pliers to adjust the size of the loop, particularly to make it small enough to fit inside the top of the glass bubble.

Step 3: Cut a piece of fishing line a few feet long. Knot one end to the silver toggle you just made. Slip the toggle inside the top of the glass CB2 ball. Then attach the other end of the fishing line to the wire grid. Hang each glass ball at varying lengths. We started from the center of the grid and worked our way out.

Step 4: In the very center of the grid we added our 2 light sockets. We wired both sockets close to the top of the grid and plugged in both cords to the ceiling fixture (or you can easily have an electrician wire the cords to a single ceiling outlet). Plug in your Half Mirror Light Bulbs.

Step 5: We added silver ball ornaments to the chandelier. We hung these balls extremely close together near the top of the grid so as to completely conceal it (the grid shouldn't show when you're done). For some of the balls we created toggles using our silver wire, and for some we simply used Christmas ornament hooks! Make sure that for each ball you hang directly on the grid that you twist the wire together so the hooks will not fall off if the chandelier is ever shaken (we live in California, so it's a factor we need to consider!).

Step 6 (optional): We ended up creating a cover around the top of the chandelier so as to conceal the chains holding it up as well as the sides of the wire grid. We simply created a light-weight crate that could be hooked to the chains holding up the rest of the chandelier. It was painted a pale pink to match the color of the walls in our store. Another option is to create a framework around the chandelier and cover it in a semi-sheer fabric so as to let the light shine through, much like a lamp shade. If you hook the chandelier close enough to the ceiling, you don't need any cover...we simply have high ceilings in our store and wanted something to finish the look of the piece.

We hope these steps help you put together your own Bubble Chandelier. We had a lot of fun creating it, and it really makes a fun project for two. We would love to build another piece, with the next chandelier on a circular grid. If we end up making a few smaller chandeliers for our fitting rooms we will be sure to let you know! If you end up making a chandelier based on our DIY, let us know!
To see more of Faire Frou Frou and our recent remodel, click here.

If you're interested in having us make a custom chandelier for you, we can be reached at info @ fairefroufrou.com.

it's raining bubbles

* * * * * * * * * * * * *
Make sure to follow us on Facebook, Twitter, Bloglovin' or Google Friend Connect
Shop with us at Faire Frou Frou

Blondeshell!


this sheer black piece kind of has an Ari Dein feel to it...

we can never resist marabou feathers


images via here, Claudia Schiffer for Vogue Germany by Ellen von Unwerth

Being pregnant works quite well on Claudia Schiffer...just look at these amazing pictures by Ellen von Unwerth for Vogue Germany! Sexy panties, sheer gowns and feathers set the stage for a cheeky editorial featuring one of our favorite models. Now these are the type of pregnancy pictures women should take!
For all of the Claudia Schiffer fans out there, the June 2010 issue of Vogue Germany is a must-buy. It features several editorials showcasing Claudia in a variety of looks/styles by artists such as Karl Lagerfeld, Camilla Akrans, Jan Welters, and of course Ellen von Unwerth. You really see Claudia's range as a model in these pictures.

* * * * * * * * * * * * *
Make sure to follow us on Facebook, Twitter, Bloglovin' or Google Friend Connect
Shop with us at Faire Frou Frou